📄 Creating a Consignment
Overview
Creating a consignment in Machship is a straightforward process that allows you to generate shipping labels for packages. This guide will walk you through the steps to create a consignment, from selecting a company to printing the shipping label.
Accessing the Consignment Creation Page
To create a consignment, follow these steps:
- Navigate to the top selection bar
- Hover over "Create/Manage"
- Select "Unmanifested Consignments"
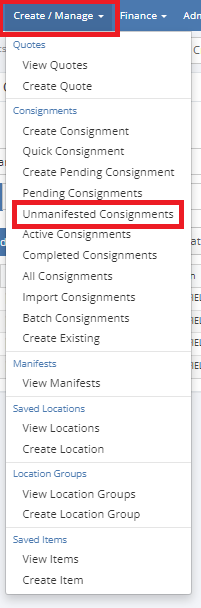
This will open the main page where consignments are created and managed.

Selecting a Company
Consignments can be created for specific companies. To select which company your order will be charged to:
- Click on the eye icon in the top right corner to open the dropdown menu of companies
- Select the appropriate company from the list
- Once selected, the eye icon will turn yellow
- A popup in the bottom left corner will appear, stating "You are currently impersonating [Company Name]"
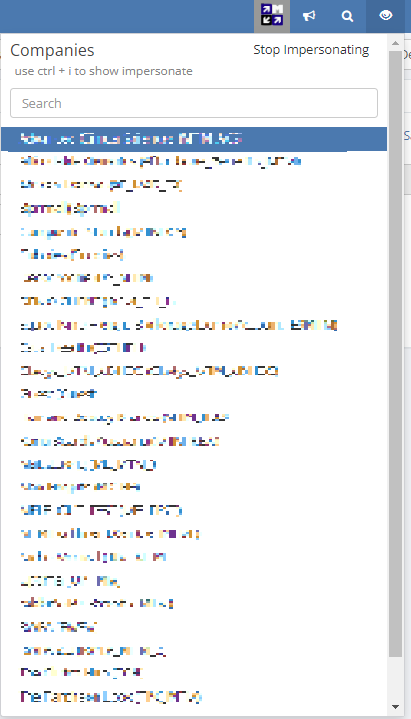
If you need to create a consignment for a different company, you can change the selection at any time by clicking the eye icon again and choosing another company.
Creating a New Consignment
Once a company is selected, follow these steps to create a new consignment:
- Press the "Create" button to open the "Create Consignment" window
- The page is divided into three main sections:
- Top section: Enter pickup and delivery location addresses
- Middle section: Enter package dimensions and select delivery requirements
- Bottom section: Select the appropriate courier for the package
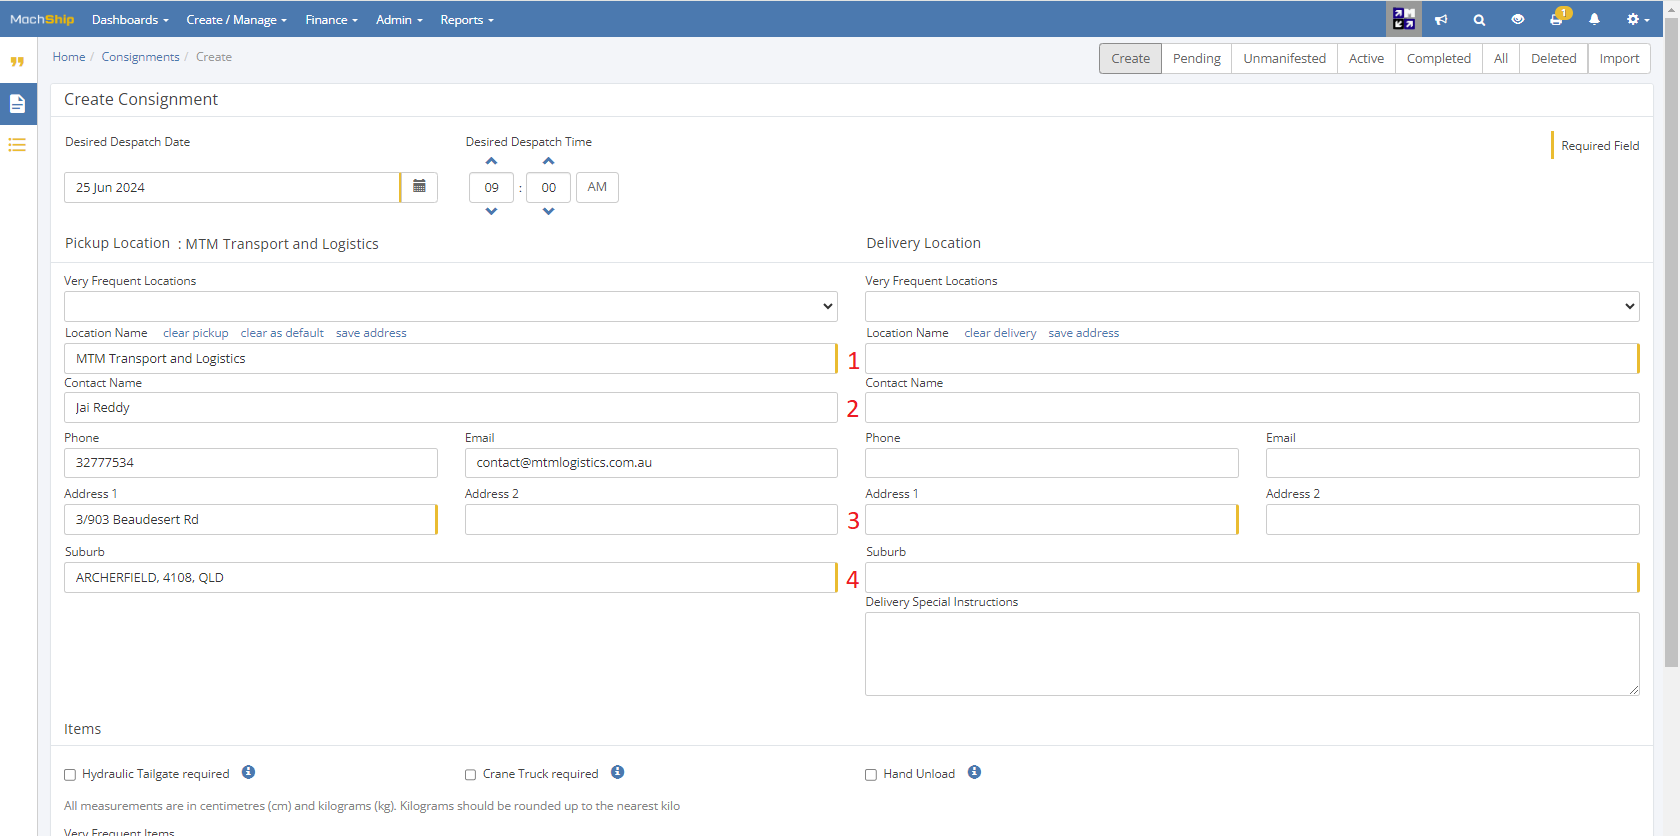
The pickup location is usually already filled in based on the selected company. However, you should always verify this information before proceeding.
Entering Address Information
Delivery Address (Section 1)
- Enter the location name (business name or client name)
- The system will search and provide autofill options that match the name
- Select the appropriate option from the dropdown list
Always double-check autofilled addresses, as places may have alternate address locations that could affect delivery.
Additional Address Details (Section 2)
This section is optional but recommended for residential deliveries. It allows you to add:
- Unit/apartment numbers
- Building names
- Additional delivery instructions
Street Address and Suburb (Sections 3 and 4)
These sections are mandatory and include:
- Street address (primary building address)
- Secondary address information (unit numbers, PO box numbers, etc.)
- Suburb name or postcode
If the address contains a unit number, PO box number, or other secondary location information, enter the primary building address in spot 1 and the secondary address in address spot 2.
If the suburb name or postcode differs from the options provided, it's recommended to verify the correct information using Google Maps or another reliable source.
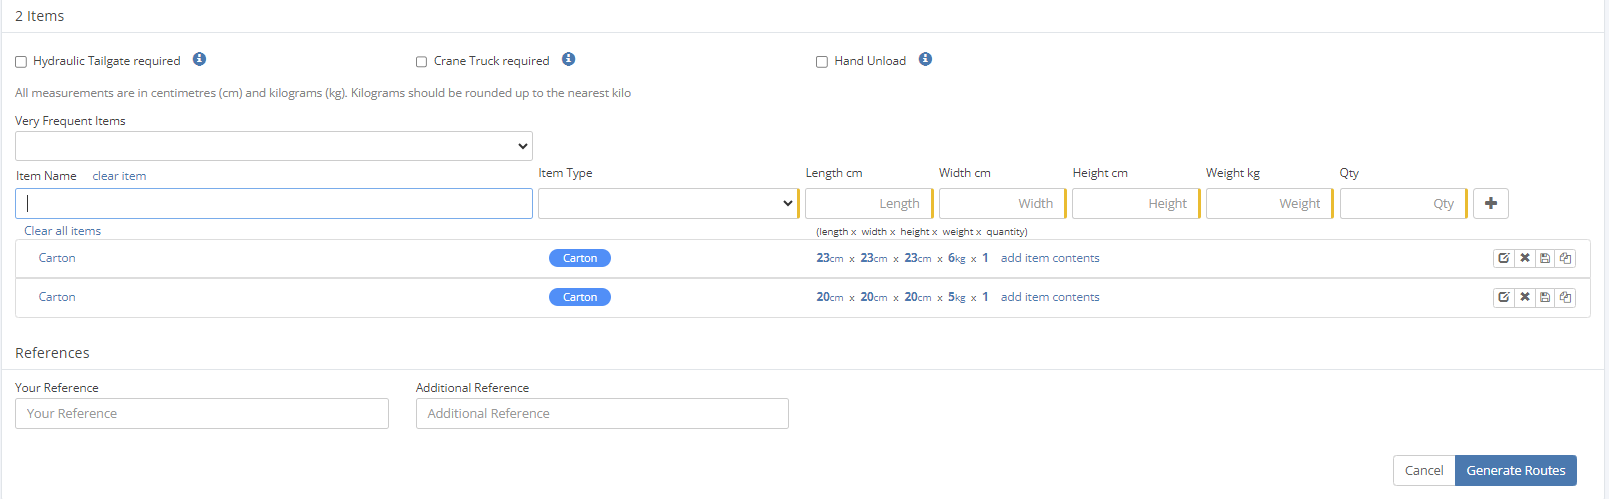
Entering Package Details
The middle section of the page is where you enter package details:
Using Predefined Items
- The "Very Frequent Items" dropdown menu offers premade item dimensions for common package types
- Options include standard sizes like 3kg satchels or 10kg boxes
- Select the appropriate option from the dropdown
While convenient, predefined items may not always match your actual package dimensions. It's recommended to verify these measurements for accuracy.
Using Saved Item Templates
- The "Item Name" field allows you to select from packages already added to the company's account
- This is useful for companies that frequently send packages with known sizes and weights
- Select the appropriate template from the dropdown
Manual Entry
If no predefined option is available, fill in the information manually:
- Item Type: Select the type of package (e.g., carton, satchel, pallet)
- Press 'c' to quickly select "carton" as the item type
- Dimensions: Enter length, width, and height in centimeters
- Weight: Enter the weight in kilograms
- Round up to the nearest kilogram for accurate pricing
- Quantity: Specify the number of identical packages
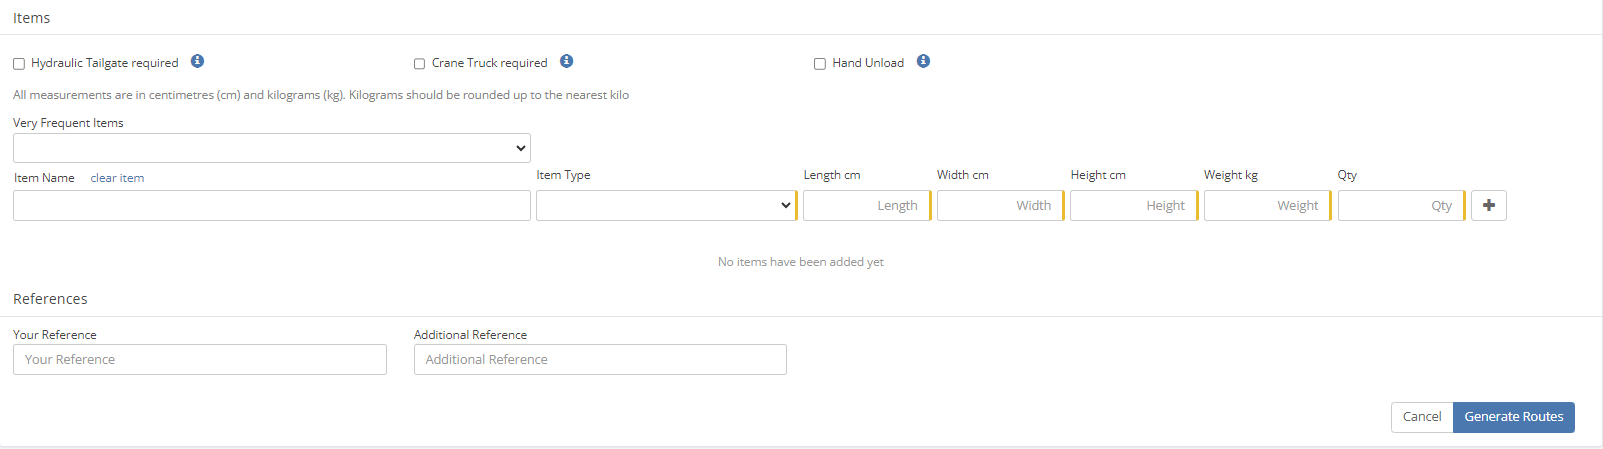
All dimensions are in centimeters, and weight is in kilograms. Always round weights to the nearest kilogram for accurate pricing.
Adding Multiple Packages
You can add multiple packages to a single consignment in two ways:
- Same Dimensions: Use the "Qty" field to specify the number of identical packages
- Different Dimensions: Click the plus button to add another package with different specifications
Setting Delivery Options
Residential Delivery
Above the item dimensions section, there is an option to select "Is this a residential delivery?" This must be checked for residential deliveries to ensure proper pricing and handling.
Reference Numbers
Below the item dimensions section, you can add:
- Order Reference: Used to ensure the label is associated with the correct order
- Package Reference: Location depends on the company's requirements
Reference numbers are crucial for tracking and identifying packages throughout the shipping process.
Selecting a Courier
After entering the item information and verifying the address:
- Press "Generate Route" to see available courier options
- The system will display a list of carriers that can deliver to the specified address
- Each option will show estimated delivery time and cost
For guidance on selecting the appropriate carrier, refer to the Courier Information guide.
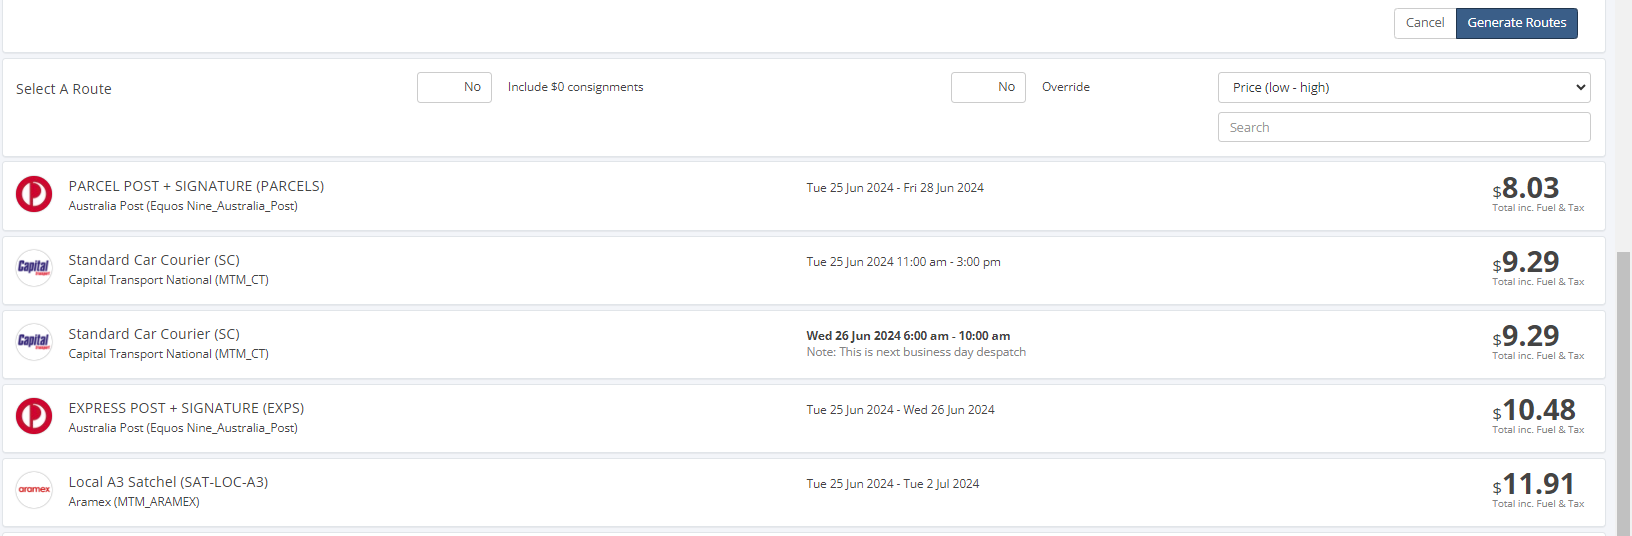
Reviewing and Creating
- Select the preferred courier from the options
- Review the address location and pricing information
- Press "Create Consignment" to finalize the consignment
- You will be redirected to the "Unmanifested Consignments" page, where your new order will appear
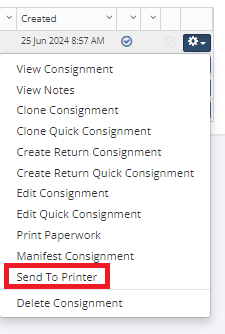
Printing Shipping Labels
Printing a Single Label
To print a label for a single consignment:
- Click on the blue cog icon to the right of the order
- Select "Send to Printer" from the dropdown menu
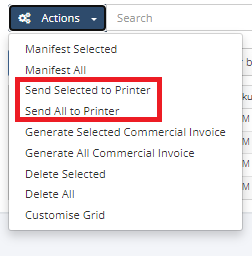
Printing Multiple Labels
To print labels for multiple consignments:
- Click the cog icon above the list labeled "Actions"
- Choose either "Send Selected to Printer" or "Send All to Printer"
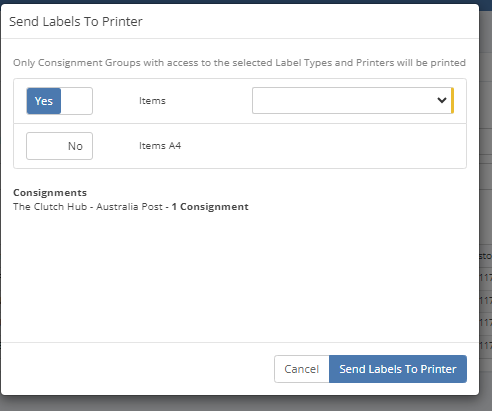
Printer Settings
- In the "Send Labels to Printer" window, ensure "Items" is set to "Yes"
- Select the appropriate printer from the dropdown menu
- The available printers will depend on the selected company
- Click the blue "Send Labels To Printer" button in the bottom right
Editing Consignments
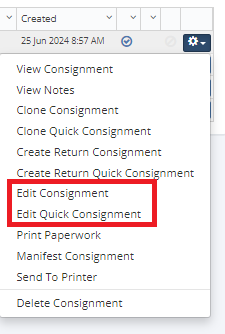
If you need to modify a consignment after creation:
- Click on the blue cog next to the order
- Select either "Edit Quick Consignment" or "Edit Consignment"
- Make the necessary changes
- Save the updated consignment
If a package needs to be returned, refer to the Creating a Return guide for instructions.
Best Practices
- Verify Addresses: Always double-check delivery addresses to ensure accuracy
- Accurate Dimensions: Measure packages carefully and round weights to the nearest kilogram
- Residential Flagging: Always check the residential delivery option when applicable
- Reference Numbers: Include order reference numbers for easy tracking
- Carrier Selection: Choose carriers based on package size, weight, and destination
- Label Printing: Print labels promptly to avoid delays in shipping
- Error Correction: If errors are found, edit the consignment before manifesting